Build a Highly Available Pi-hole Cluster with Ansible (VRRP)

Step-by-step guide to prepare two Linux hosts, then use Ansible to deploy a highly available Pi-hole pair with keepalived (VRRP) and a Virtual IP, plus config sync and validation - powered by my open-source playbook: ansible-pihole-cluster
Download & flash the OS for Raspberry Pi#
Both ansible-bootstrap and ansible-pihole-cluster support the following distributions:
- Debian 13 (Trixie)
- Ubuntu 24.04 (Noble Numbat)
- Rocky Linux 10
This guide uses Rocky Linux as an example, but feel free to pick whichever you prefer.
1) Get the Raspberry Pi image#
- Go to the official Rocky Linux Download page: pick ARM (aarch64).
- Scroll to the Raspberry Pi Images section and download the image for your Pi.
2) Flash the image to a microSD card#
You can use balenaEtcher (what I use below), or Raspberry Pi Imager—both work.
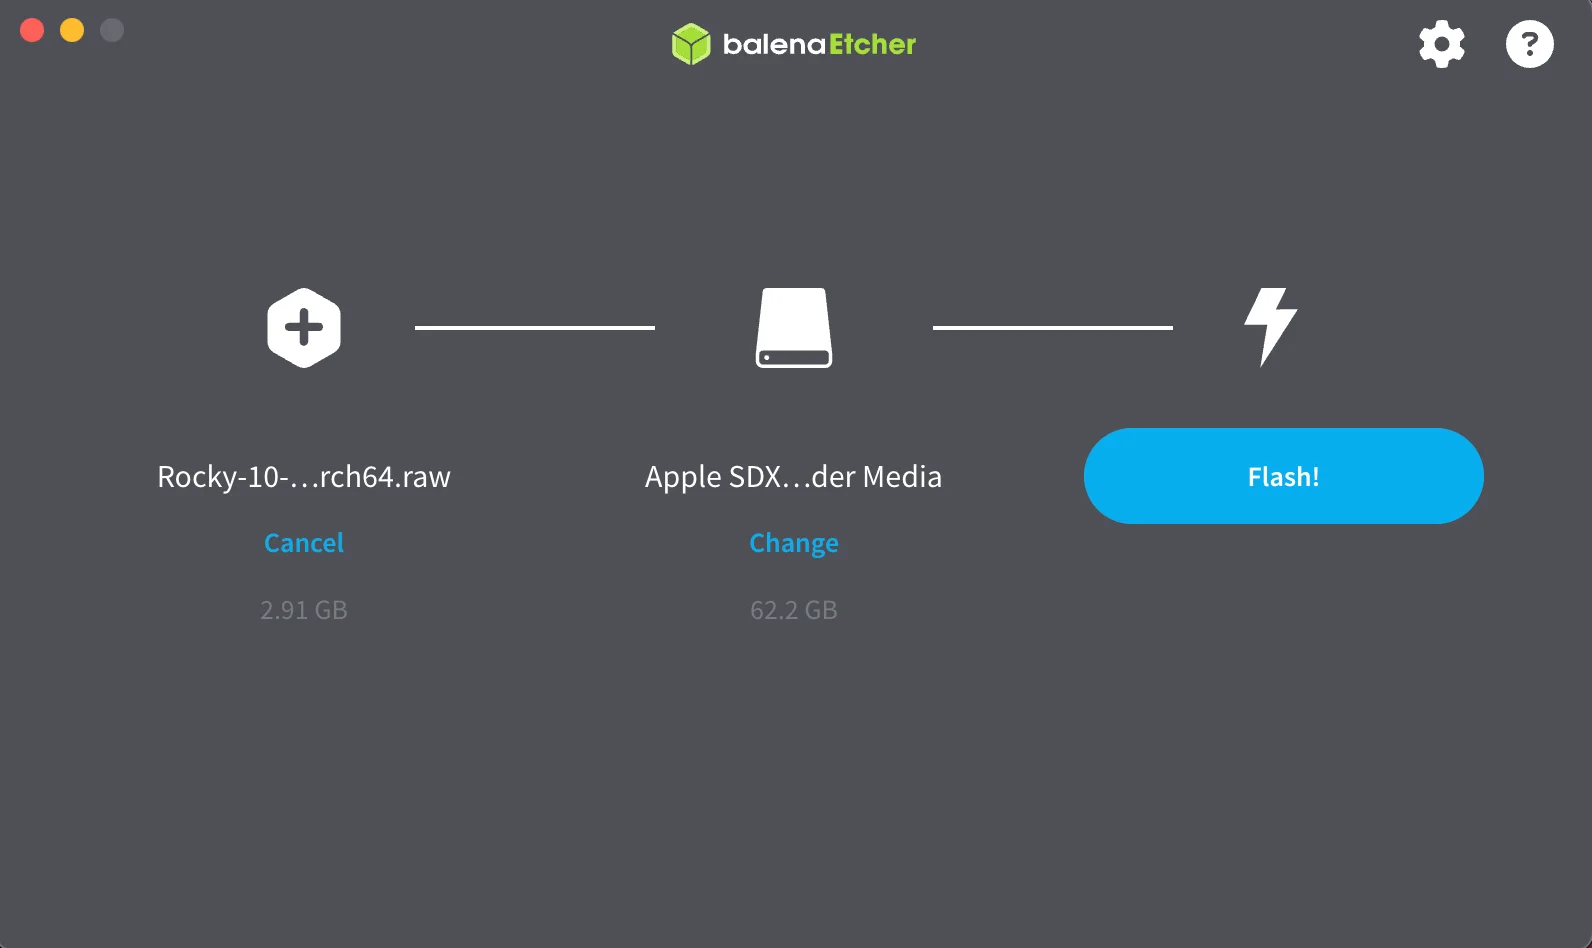
Option A — balenaEtcher#
- Install/open balenaEtcher.
- Flash from file → pick the Rocky Linux RPi image.
- Select target → choose your microSD card.
- Flash! → wait for completion.
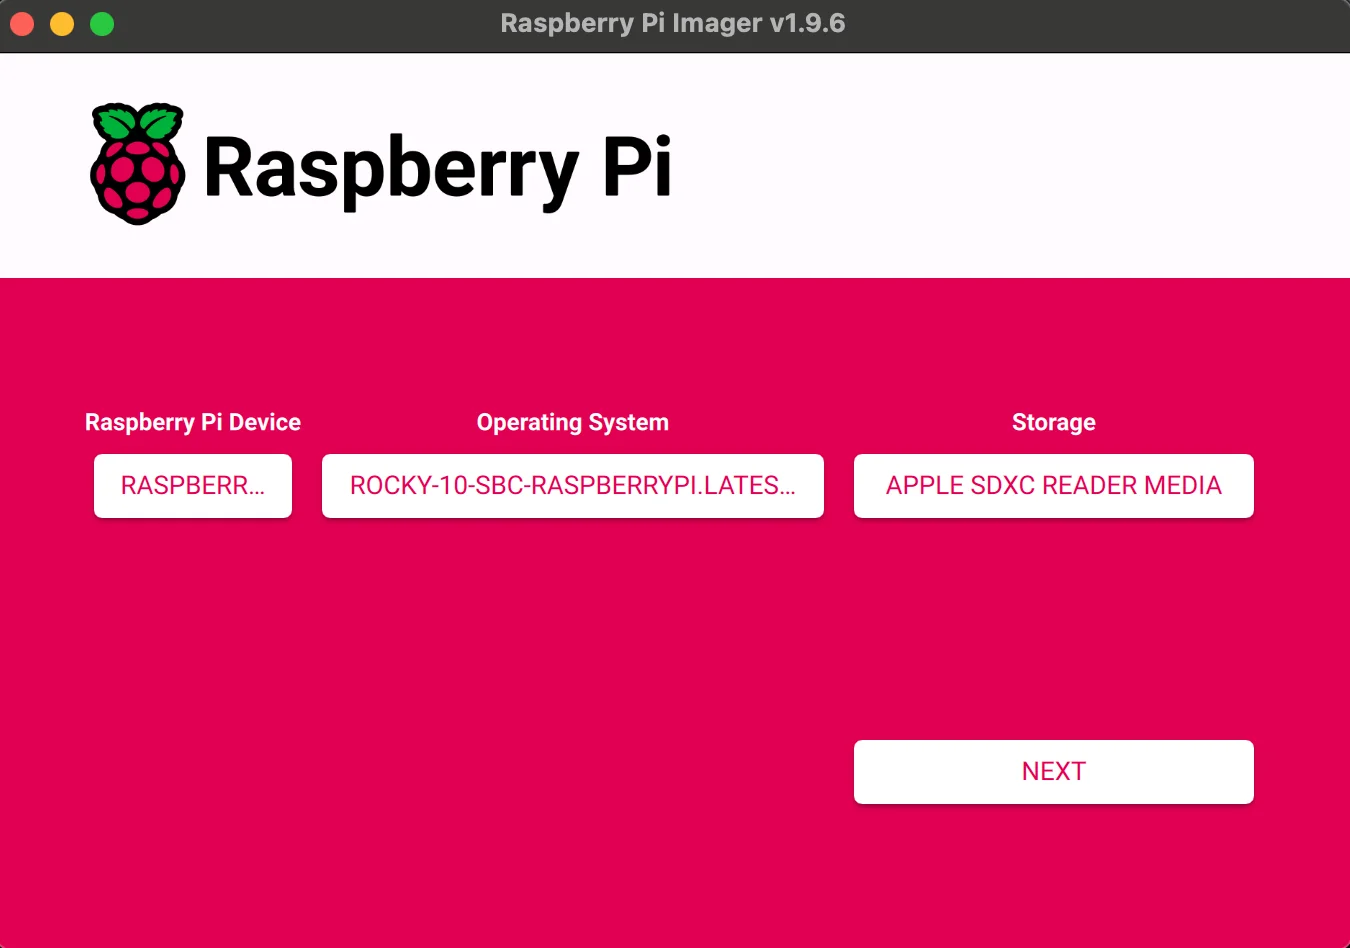
Option B — Raspberry Pi Imager#
- Open Raspberry Pi Imager.
- Click Choose OS → Use custom and select the Rocky Linux RPi image.
- Choose your microSD card and Next.
- When asked “Would you like to apply OS customisation settings?” click No (we’ll configure users/SSH/hostname later).
- You’ll get a Warning that all data on the card will be erased — click Yes.
Repeat this flashing process for both microSD cards (one per Raspberry Pi), then boot each Pi and make sure it gets a DHCP address on your network.
Bootstrap: admin user, SSH keys, SSH hardening, networking, filesystem expansion#
Before deploying Pi-hole, each node needs initial setup — an admin user with SSH key access, hardened SSH, static IP configuration, firewall rules, and the filesystem expanded to use the full microSD card. You can automate all of this with ansible-bootstrap:
- Creates admin user with passwordless sudo
- Generates and deploys SSH keys
- Hardens SSH (disables password authentication and root login)
- Configures static IPv4/IPv6 addresses, gateway, and DNS
- Sets up firewall (firewalld) with custom zones and services
- Expands the filesystem to use all available disk space
1) Install the collection#
ansible-galaxy collection install danylomikula.ansible_bootstrap
2) Create the inventory#
Create inventory.ini with your nodes. The ansible_host should be the current DHCP address of each Pi, while bootstrap_static_ip and bootstrap_gateway define the static network configuration that will be applied:
[servers]
pihole-master ansible_host=10.20.160.251 bootstrap_static_ip=10.20.0.50/16 bootstrap_gateway=10.20.0.1
pihole-backup ansible_host=10.20.200.39 bootstrap_static_ip=10.20.0.51/16 bootstrap_gateway=10.20.0.1

[servers:vars]
ansible_user=rocky
Note: On first run,
ansible_useris the default OS user (e.g.,rockyfor Rocky Linux). After bootstrap completes, the new admin user is created and the nodes are accessible via SSH keys.
3) Create the bootstrap playbook#
Create site.yml:
---
- name: Bootstrap servers
  hosts: all
  become: true
  vars:
    bootstrap_user: "dan"
    bootstrap_ssh_key_generate: true
    bootstrap_network_enabled: true
    bootstrap_dns4:
      - "1.1.1.1"
      - "1.0.0.1"
    bootstrap_firewall_enabled: true
    bootstrap_firewall_zone: "public"
    bootstrap_firewall_services:
      - ssh
      - http
      - https
      - dns
    bootstrap_firewall_custom_zones:
      - name: ftl
        interface: lo
        ports:
          - port: 4711
            proto: tcp
    bootstrap_firewall_allow_icmp: true
    bootstrap_expand_fs_enabled: true
  roles:
    - danylomikula.ansible_bootstrap.bootstrap
4) Run the bootstrap playbook#
On the first run, SSH keys are not yet deployed, so you need to provide the password interactively:
ansible-playbook -i inventory.ini site.yml -k -K
Default credentials for Rocky Linux: User:
rocky, Password:rockylinux
After bootstrap completes, the nodes reboot with their new static IPs. SSH keys are generated in the ssh_keys/ directory — you’ll reference these keys later in the Pi-hole cluster inventory.
See the ansible-bootstrap README for the full list of configuration options.
Deploy Pi-hole cluster with Ansible#
Prerequisites: Ansible installed on your configuration device and both nodes bootstrapped (see previous section).
1) Install the collection#
ansible-galaxy collection install danylomikula.ansible_pihole_cluster
2) Create the inventory#
Create inventory.ini with your nodes. Point ansible_ssh_private_key_file to the SSH keys generated by ansible-bootstrap:
[master]
pihole-master ansible_host=10.20.0.50 ansible_ssh_private_key_file=../pihole-bootstrap/ssh_keys/pihole-master_ed25519 priority=150

[backup]
pihole-backup ansible_host=10.20.0.51 ansible_ssh_private_key_file=../pihole-bootstrap/ssh_keys/pihole-backup_ed25519 priority=140

[pihole_cluster:children]
master
backup
Note: Adjust the
ansible_ssh_private_key_filepaths to match where your bootstrap SSH keys are stored.
3) Create the playbook#
Create site.yml with all cluster configuration in one place:
---
- name: Deploy Pi-hole HA Cluster
  hosts: pihole_cluster
  become: true
  vars:
    ansible_user: dan
    bootstrap_timezone: "America/New_York"
    keepalived_vip_ipv4: "10.20.0.53/16"           # Virtual IP for failover
    pihole_web_password: "SUPER_SECURE_PASSWORD"    # Use ansible-vault!
    pihole_version: "6.3"
    nebula_sync_version: "v0.11.1"
    pihole_local_domain: "homelab.local"
    local_dns_records: |
      10.20.0.88 node.homelab.local
      10.20.0.96 nas.homelab.local
  roles:
    - role: danylomikula.ansible_pihole_cluster.updates
    - role: danylomikula.ansible_pihole_cluster.bootstrap
    - role: danylomikula.ansible_pihole_cluster.docker
    - role: danylomikula.ansible_pihole_cluster.keepalived
    - role: danylomikula.ansible_pihole_cluster.unbound
    - role: danylomikula.ansible_pihole_cluster.pihole
    - role: danylomikula.ansible_pihole_cluster.pihole_updatelists
    - role: danylomikula.ansible_pihole_cluster.nebula_sync
    - role: danylomikula.ansible_pihole_cluster.status
See the full list of available variables in the group_vars/all.yml example.
What the playbook installs (and why)
- keepalived — Provides VRRP and the floating Virtual IP so one node is always the active DNS endpoint. If the master goes down, the backup takes over automatically.
- unbound — A local validating, recursive DNS resolver. Pi-hole forwards queries to Unbound on-box instead of public resolvers, improving privacy and reducing external dependency. Pi-hole’s official guide
- nebula-sync — A lightweight synchronizer that keeps Pi-hole config/state in sync between nodes (lists, local DNS, settings). Project
- pihole-updatelists — Automates fetching and applying block/allow lists from remote sources on a schedule. Project
4) (Optional) Quick connectivity test#
ansible all -i inventory.ini -m ping
5) Deploy the cluster#
ansible-playbook -i inventory.ini site.yml
6) Point your network to the Virtual IP#
Update your DHCP/router (or manual client settings) to use the VIP you set in site.yml:
- IPv4 DNS:
keepalived_vip_ipv4(e.g.,10.20.0.53) - IPv6 DNS:
ipv6_vip(if configured)
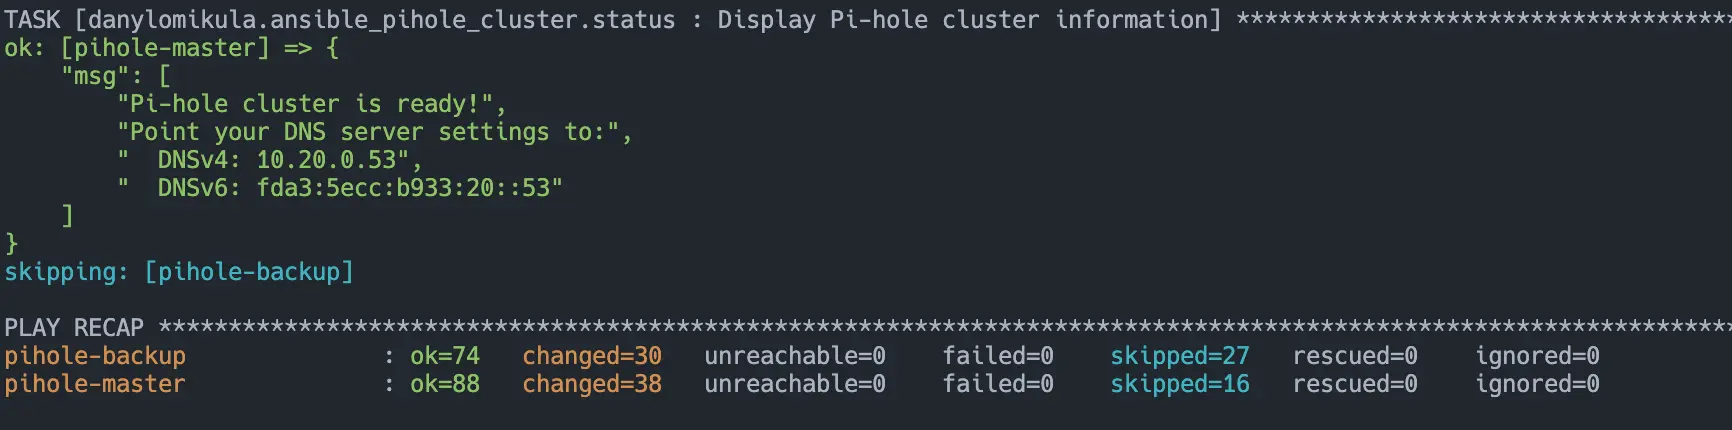
7) Verify#
On whichever node should be master (higher priority), check that the VIP is present:
ip a show dev eth0
Confirm Pi-hole is answering:
dig @10.20.0.53 example.com +short
If that resolves, you’re done — your HA Pi-hole pair is live behind a single Virtual IP.